ShikataLab v1 [Part 2]: Networking
So the main issue i’ve been sort-of experiencing with my lab is the desire to deploy and maintain items on a completely segregated network
Approaches aside; the ideal scenario would be something like this:
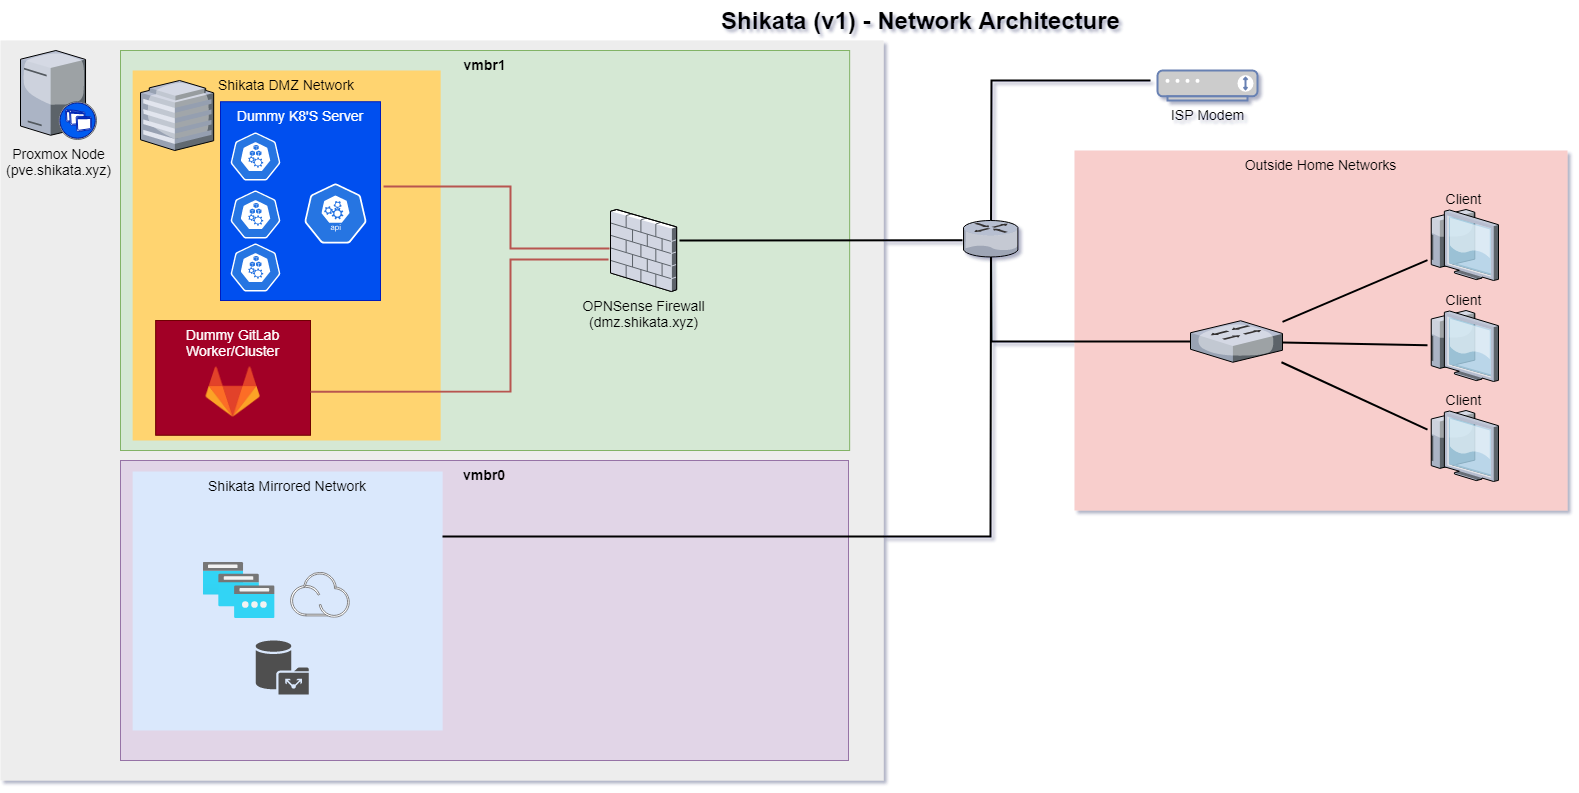
To implement, we will use a simple combination of ProxMox Virtual Networking and a deployment of OPNSense, a external firewall and routing platform based on Free-BSD
Creating our virtual networks
This part is fairly simple; create a separate virtual network. By default Proxmox implements Linux Network Bridging as part of its network segregation topology, so there are two ways you can go about this
Either
- Scripting a new Linux Bridge (which is what I usually do) with the below commands
ip link add name vmbr1 type bridge
ip link set vmbr1 up
This will create a new network interface, (vmbr1) and add an entry in /etc/network/interfaces - you can then configure the default initiation that comes up for this card by editing details to the entry
auto vmbr1
iface vmbr1 inet static
        address 192.168.3.0/24
        bridge-ports none
        bridge-stp off
        bridge-fd 0
        up ip route add 192.168.3.0/24 via 192.168.3.1
#Internal Network (192.168.3.0/24)
(The comment indicates the commented network that shows up in other networking tools (Proxmox GUI + nmTui/Gui setups))
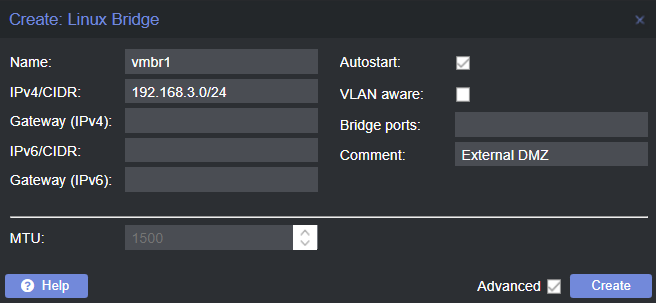
- Adding via the ProxMox GUI Also fairly simple, simply
go to your Proxmox data node, edit
System -> Network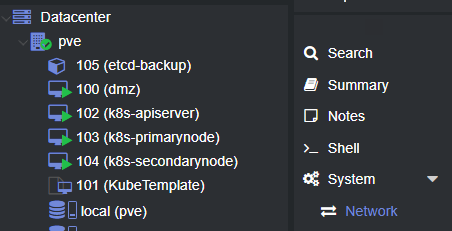
Select ‘Create -> Linux Bridge’ and enter the similar information (NOTE, you do NOT need to add a virtual network gateway here, a gateway can only be ‘owned’ by one device)
Once complete, you should have a separated virtual network, however communication between the internal and external networks is pretty much non-existant (which isn’t really helpful if you ever want to access external packages / internal tooling from machines inside of the DMZ) - to fix this, we can set up that firewall I mentioned earlier
Deploying OPNSense
There are many, many discussions on what overarching networking software you should use here, I prefer setting up using OPNSense due to its nicer looking GUI and implementation of FauxAPI - a client library that enables programmatic access to Pf/OPNsense firewalls
First, fetch the image from OpnSense’s downloads page - use a similar system architecture image to what promxox is running on (most likely amd64)
Now create a VM, first by passing the ISO to your local storage node:
Then setting up the networking to connect to your INTERNAL dmz. After completion; add the new network interface to your node
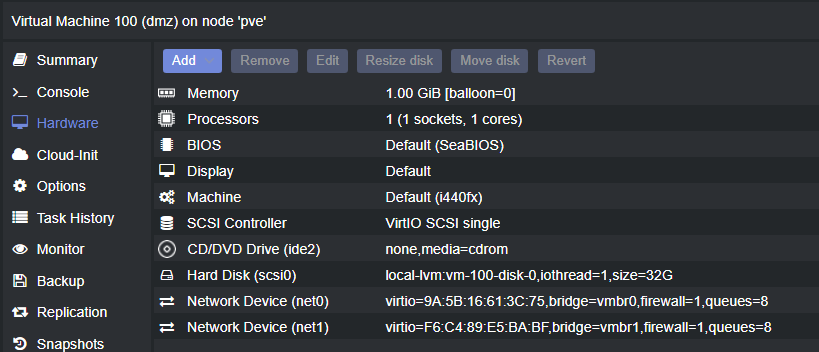
restart and begin the CMD setup of your OPNSense box; be sure to note the MAC addresses that are representing your connections to both the External and Internal networks (as seen in the Hardware page above) - set your LAN network to your external DMZ network (the one above is the network under the 192.168.3.0 network), and your WAN network to your external internet-connected network interface
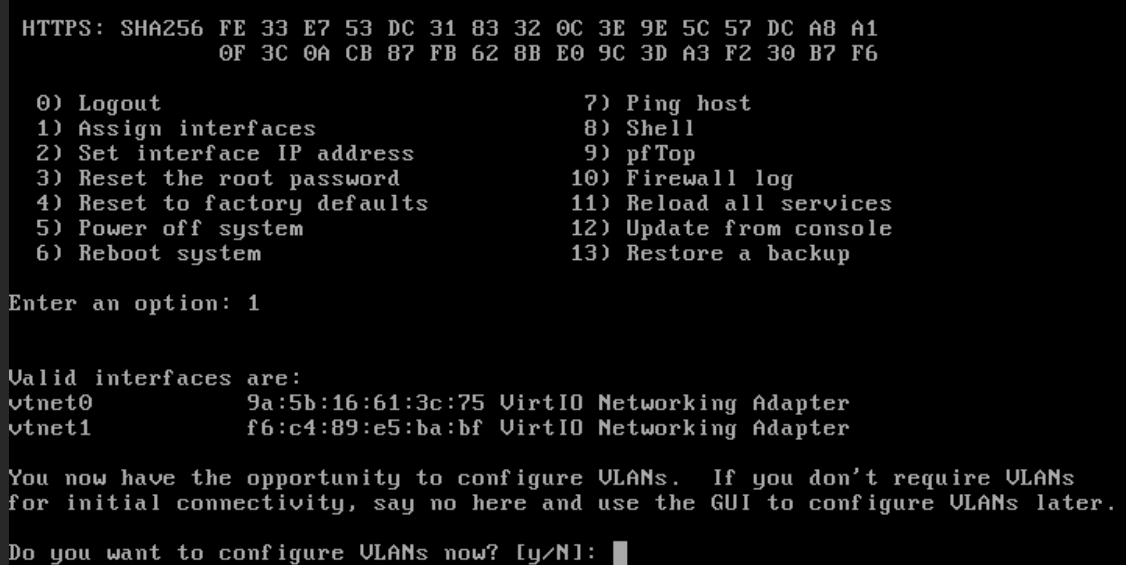
Once complete, a success message will appear, giving you a URL to where you can access the web portal; but you’ll probably find that you cannot connect to it; this is by design. OPNSense doesn’t allow portal access from WAN to LAN, so we need to do a quick little configuration to the firewall to enable this
Enabling access to your DMZ
To enable temporary access to the web ui, you want to enter shell (Default entry is 8 for this) and type in the following
pfctl -d
This will disable the networking firewall and temporarily allow any<->any networking from the DMZ to the external network; which will allow us to access the portal, you should be able to connect now with the username root and password opnsense
To add a new rule to enable access to the portal, simply go to Firewall -> Rules -> Floating and create a rule as follows:
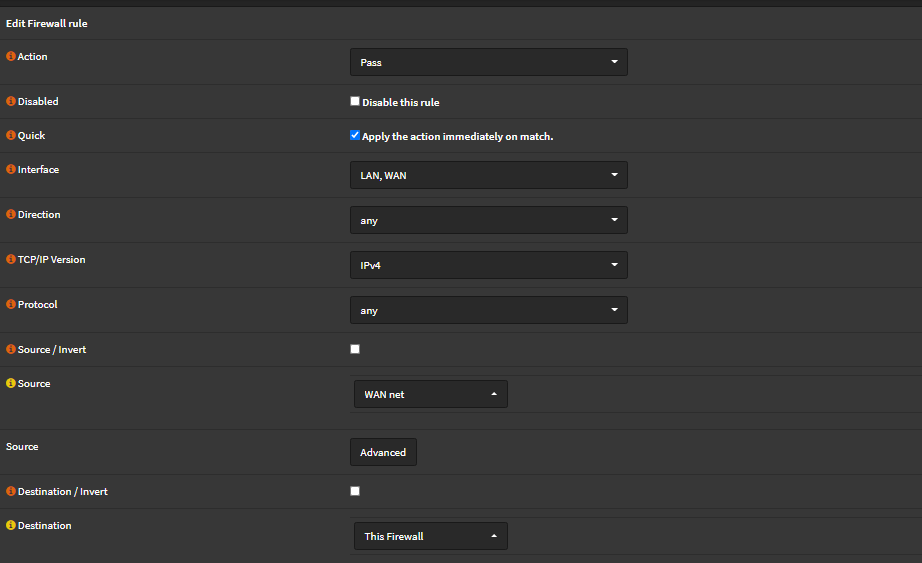
This will give us full access to the firewall from either our WAN or LAN network to be safe, be sure the rule is implemented and then go back to OPNSense and run the following:
pfctl -e
Refresh, and you should still have connectivity to your DMZ. Now we can start with adding hostname resolution!
Internal Resolution
In-Depth
This section is very dependant on your ISP, along with access to your modem. I personally don’t have access to modify DNS entries in my modem (mostly due to the modem not being owned by me :( ) - so a small amount of workaround is needed. You have three main options, lowering in validity
Using a Cloud Solution, such as Route53 to Forward Local Traffic to local homelab - I personally do not recommend this, however it is a fairly easy solution with some sort of internal DNS propagation
Using a simple Unbound forwarder on PFSense, or creating an external container for DNS resolution in your DMZ (Some HomeLab enthusiests use Pi-Hole or OPNSense’s built in Unbound DNS Service)
I go with option 2 every time just due to ease-of-use, but there are two main changes that you have to make going with this option
- You must change either the local DNS setting on your modem to point to the IP of that server OR change every machine that needs access locally using a user-defined secondary DNS server
- You should change the Proxmox Node environment to point to this DNS
To enable this, we can simply do the following
Implementation
On your OPNSense device, create a new rule using a floating IP to enable all DNS traffic inbound from your network

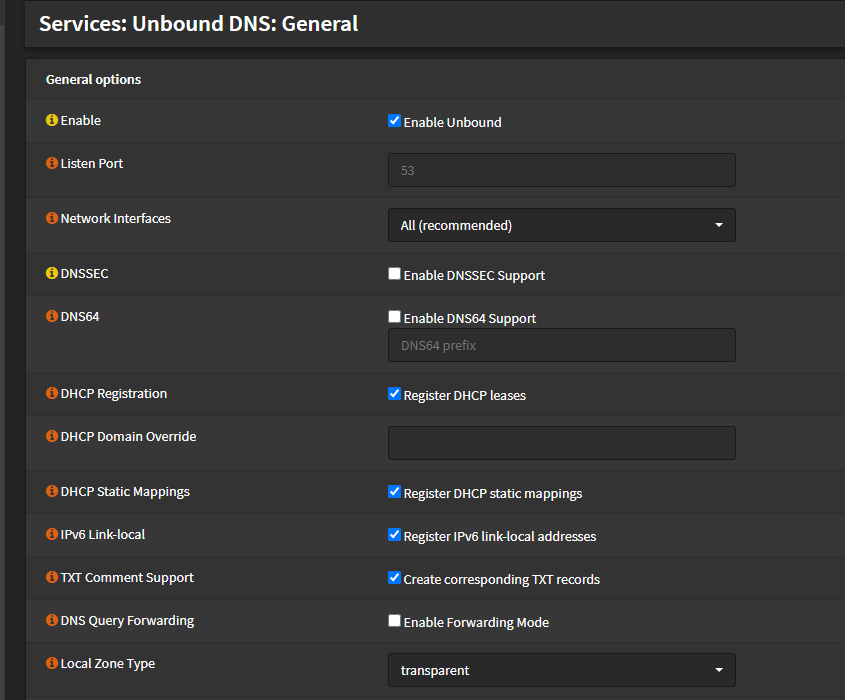
Enable Unbound on your OPNSense device by going to Services -> Unbound DNS.
I prefer also enabling DHCP on the LAN interface as well to start having custom domain names for various clients
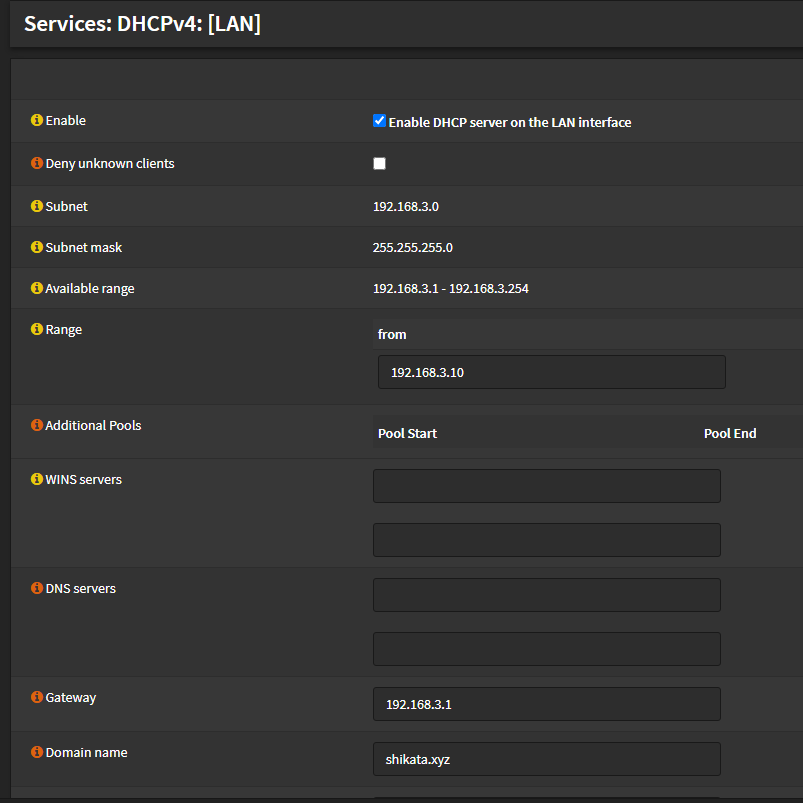
This also gives us flexibility to create local handy DNS aliases for our machines. Finally, lets enable this on all future machines in the DMZ network by going to System -> DNS on the PVE node we have provisioned, and adding the following:
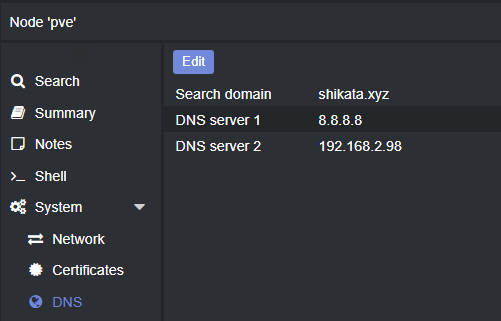
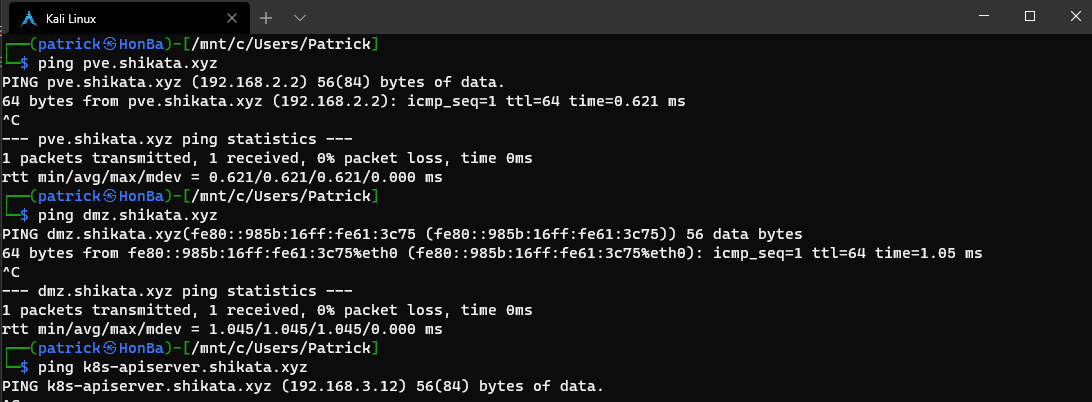
With this, we can create a new container and have it automatically resolve items in our lab - the last thing we should do is enable this on clients within your home.
Sadly, since I do not have administrative access to the router, the only real option personally have is registering a static DNS entry in my home machine. (Which is fairly simple to do, see here if you don’t know how to accomplish this via your modem or local machine)
and boom - we suddenly have a set network for me and my roommates to test stuff out in the lab, I just have to enable additional firewall rules for internal services as they are brought up!
Now I just have to fix everything having invalid certificates and I am set!